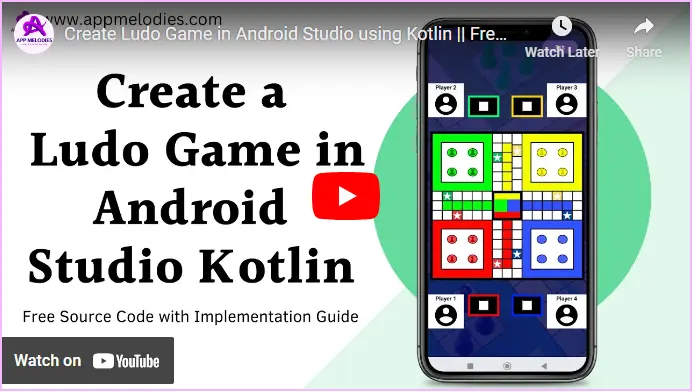
Develop a Ludo Game in Android Studio Using Kotlin and embark on an exhilarating journey into the realm of mobile gaming. If you’ve ever fancied developing a classic board game for the digital world, you’re in luck! In this comprehensive guide, we’ll walk you through the process of building a Ludo game from scratch using Android Studio and Kotlin. Plus, we’re throwing in the source code for free, so you can dive right in and start crafting your masterpiece. Let’s roll the dice and embark on this exciting adventure together!”
Step 1: Creating a New Android Project For Ludo Game in Android Studio using Kotlin
- Launch Android Studio.
- Select
New Projectfrom the File menu. - Choose
Empty Activityas the template. - Configure project details:
- Enter the project name.
- Enter the package name.
- Select the language (Kotlin).
- Select target devices and the minimum SDK version.
- Don’t forget to choose Build Configuration language to Groovy DSL
- Click
Finishto create the project.
Step 2: Adding a Sound Effect to Your Android Project For Ludo Game in Android Studio using Kotlin
- Right-click on the
resfolder in your project. - Select
Newfrom the context menu. - Choose
Android Resource Directory. - In the
Resource typedropdown, selectraw. - Click
OKto create therawdirectory. - Download the following zip file which contains source code and sound effect.
- Add the downloaded sound effect ( you will find it mp3 file in folder named as dice_rolling.mp3) to the newly created
rawfolder.
Step 3: Adding Dependency for Your Ludo Game in Android Studio
- Add following dependencies in build.gradle (App)
- sync it after adding.
					    implementation 'com.github.bumptech.glide:glide:4.16.0'
    implementation("org.jetbrains.kotlinx:kotlinx-coroutines-core:1.6.0")
    implementation("org.jetbrains.kotlinx:kotlinx-coroutines-android:1.6.0")
Step 4: Adding a required drawable files to Your Android Project For Ludo Game in Android Studio using Kotlin
- Open the extracted folder containing the drawable resources for your file manager app.
- Navigate to the
drawablefolder within the extracted folder. - Select and copy all XML files from the
drawablefolder. - Paste the copied XML files into the
drawablefolder of your Android Studio project.
Step 5: Adding Styles and Designs in the Themes File
- Double-click on the
themes.xmlfile in your project to open it. - Add the following code in the
themes.xmlfile:
					<style name="MyViewStyle"><item name="android:background">@color/white</item>
        <item name="android:layout_margin">1dp</item>
        <item name="android:layout_weight">1</item>
        <item name="android:layout_width">0dp</item>
        <item name="android:layout_height">match_parent</item></style><style name="MyViewStyle2"><item name="android:background">@color/white</item>
        <item name="android:layout_margin">1dp</item>
        <item name="android:layout_weight">1</item>
        <item name="android:layout_width">match_parent</item>
        <item name="android:layout_height">0dp</item></style><style name="Horizontal_Blocks"><item name="android:background">@color/white</item>
        <item name="android:layout_margin">1dp</item>
        <item name="android:layout_weight">1</item>
        <item name="android:orientation">vertical</item>
        <item name="android:layout_width">0dp</item>
        <item name="android:layout_height">match_parent</item></style><style name="Vertical_Blocks"><item name="android:background">@color/white</item>
        <item name="android:layout_margin">1dp</item>
        <item name="android:layout_weight">1</item>
        <item name="android:orientation">vertical</item>
        <item name="android:layout_width">match_parent</item>
        <item name="android:layout_height">0dp</item></style>
Step 6: Adding code in activity_main.xml Ludo Game in Android Studio using Kotlin
- Open the extracted folder containing the layout resources for your file manager app.
- Navigate to the
layoutfolder within the extracted folder. - Select and copy all XML files from the
layoutfolder. - Paste the copied XML files into the
layoutfolder of your Android Studio project.
Step 7: Adding code in MainActivity.kt in Android Studio
- Open the extracted folder containing the layout resources for your file manager app.
- Navigate to the
kotlinfolder within the extracted folder. - Select and copy all .kt files from the
layoutfolder. - Paste the copied .kt files into the
layoutfolder of your Android Studio project.
Step 8: Running the App
- Ensure your project is loaded and synced in Android Studio.
- Rebuild the Gradle if you encounter errors like “BuildConfig”.
- Connect your Android device via USB or set up an emulator.
- Select your device or emulator in Android Studio.
- Click the
Runbutton (green triangle icon). - The app will compile, install, and launch automatically on the selected device or emulator.
Conclusion: Congratulations! You’ve successfully embarked on the journey of creating your own Ludo game in Android Studio using Kotlin. Armed with the knowledge and skills gained from this guide, you’re now ready to unleash your creativity and build even more incredible games. Remember, the only limit is your imagination. Happy coding and happy gaming!
FAQs:
Q1: What is the purpose of creating a raw directory in Android Studio for my Ludo Game in Android Studio Using Kotlin? A1: The raw directory is used to store non-compiled resources such as audio files. In this guide, we use it to add sound effects to enhance the gaming experience in your Ludo Game in Android Studio Using Kotlin.
Q2: How do I resolve Gradle build errors like “BuildConfig” when developing my Ludo Game in Android Studio Using Kotlin? A2: If you encounter Gradle build errors while developing your Ludo Game in Android Studio Using Kotlin, try rebuilding your project by selecting Build > Rebuild Project from the menu. Ensure all dependencies are correctly configured and synced.
Q3: Can I use Java instead of Kotlin for developing a Ludo Game in Android Studio? A3: Yes, you can use Java instead of Kotlin for your Ludo Game in Android Studio. However, this guide specifically uses Kotlin for its modern features and improved syntax. If you prefer Java, you will need to adjust the code accordingly.
Q4: How do I add custom drawable files to my project when creating a Ludo Game in Android Studio Using Kotlin? A4: To add custom drawable files to your Ludo Game in Android Studio Using Kotlin:
- Open the extracted folder containing the drawable resources.
- Navigate to the
drawablefolder. - Copy the XML files.
- Paste them into the
drawablefolder of your Android Studio project.
Q5: What should I do if the emulator is not working properly while testing my Ludo Game in Android Studio Using Kotlin? A5: If the emulator is not working while testing your Ludo Game in Android Studio Using Kotlin:
- Check if your system meets the requirements for running an emulator.
- Ensure that virtualization is enabled in your BIOS settings.
- Try using a different emulator or updating the current one.
- Alternatively, you can test the app on a physical device connected via USB.
Q6: How can I customize the styles and themes for my Ludo Game in Android Studio Using Kotlin? A6: You can customize the styles and themes for your Ludo Game in Android Studio Using Kotlin by editing the themes.xml file. Add or modify style elements to change the appearance of your game, such as background colors, margins, and layout properties.
Q7: Why is it important to set the minimum SDK version for a Ludo Game in Android Studio Using Kotlin? A7: Setting the minimum SDK version for your Ludo Game in Android Studio Using Kotlin ensures that your app runs on devices with the specified Android version or higher. It helps you target the appropriate audience and ensures compatibility with essential features and APIs.
Q8: Where can I find the source code for my Ludo Game in Android Studio Using Kotlin project? A8: The source code for your Ludo Game in Android Studio Using Kotlin is provided within the guide. You can follow the steps to copy and paste the necessary files into your project. Additionally, you can provide a downloadable link to the complete source code in your blog post.
Q9: What are some common issues to watch out for when developing a Ludo Game in Android Studio Using Kotlin? A9: Common issues when developing a Ludo Game in Android Studio Using Kotlin include:
- Gradle build errors.
- Emulator performance problems.
- Resource file conflicts or incorrect paths.
- UI layout inconsistencies.
- Ensuring compatibility across different device sizes and resolutions.
Q10: How can I further enhance my Ludo Game in Android Studio Using Kotlin after following this guide? A10: To enhance your Ludo Game in Android Studio Using Kotlin:
- Add multiplayer functionality.
- Implement animations for smoother gameplay.
- Integrate a scoring system and leaderboards.
- Enhance the UI/UX with custom graphics and sounds.
- Add AI opponents for single-player mode.
You may also like this posts: https://appmelodies.com/file-manager-app-in-android-studio/


